Category: Financial Education for Teens/College Students

  • 1.How to Read Your First Pay Stub (Line-by-Line Explanation)

    1.How to Read Your First Pay Stub (Line-by-Line Explanation)

    Meta Description: Learn how to read your first pay stub with this active line-by-line guide. Understand gross pay, deductions, and net pay so you know where your money goes.

    Introduction

    When you receive your first paycheck, learning how to read your first pay stub becomes essential for understanding your finances. That piece of paper or digital document contains a wealth of information about your earnings and where your money actually goes. Many new employees look at their pay stub and feel confused by all the numbers and abbreviations.

    Do not worry—this guide walks you through how to read your first pay stub line by line, explaining every section in plain language. By the end, you will understand exactly why your take-home pay differs from your hourly rate or salary. Mastering how to read your first pay stub empowers you to catch errors and budget accurately. Let us break down this important document together.

    What Exactly Is a Pay Stub?: What Exactly Is a Pay Stub?

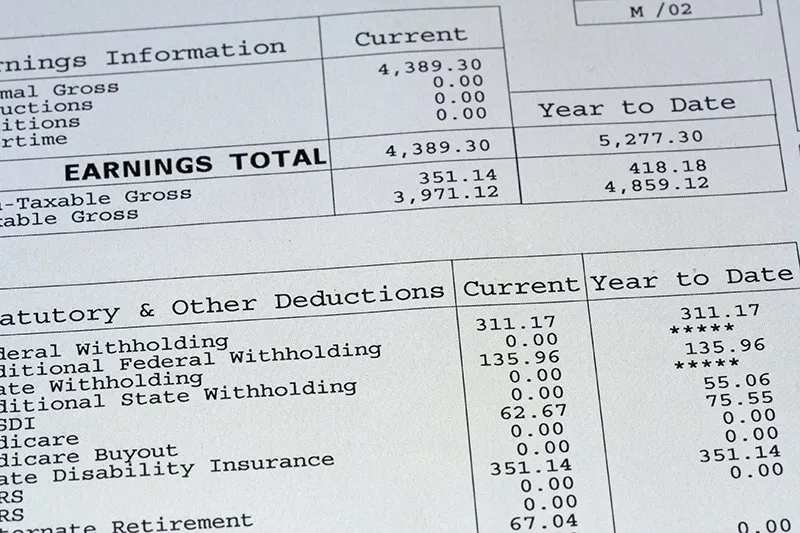
    Before diving into the lines, you must understand what a pay stub actually is. A pay stub is a physical or digital document that accompanies your paycheck and summarizes your earnings for a specific pay period . It details your gross earnings, all taxes and deductions withheld, and the final net pay deposited into your bank account . Today, most employees receive digital pay stubs through an employee portal rather than paper copies . Learning how to read your first pay stub means familiarizing yourself with these five main sections: personal information, pay period, gross earnings, taxes and deductions, and net income . Each section plays a specific role in documenting your compensation.

    Section 1: Personal Information

    The top portion of your pay stub contains identifying details for both you and your employer. When learning how to read your first pay stub, always start here to verify accuracy.

    Your Personal Details

    This section includes your legal name, home address, and often the last few digits of your Social Security number or employee ID . Your filing status and number of exemptions from your W-4 form may also appear here . Check that your name is spelled correctly and your address is current. Errors in personal information can lead to tax document problems later.

    Employer Information

    Your employer’s name and address appear at the top as well . This confirms which company issued the payment. If you work multiple jobs, verifying the employer helps you track which paycheck belongs to which job.

    Why This Section Matters

    Your filing status determines how much tax your employer withholds from each paycheck . If your status is wrong—for example, listed as single when you are married—you might have too much or too little tax withheld. This directly affects your net pay and potential tax bill in April. Verifying this information is a key part of how to read your first pay stub.

    Section 2: Pay Period and Pay Date

    The next section clarifies the timeframe your payment covers. Understanding how to read your first pay stub means knowing exactly when you earned the money.

    Pay Period Dates

    The pay period shows the start and end dates of the work cycle for which you are being paid . For example, it might say “January 1, 2026 to January 15, 2026.” This confirms you are receiving payment for the correct weeks. If you started mid-cycle, verify that the dates match your actual start date.

    Pay Date

    The pay date is when the payment was issued . This matters for budgeting and tracking when money hits your bank account. Some employers pay on the last day of the pay period, while others pay a week later. Knowing your pay date helps you plan bill payments.

    Section 3: Gross Earnings

    Now we reach the numbers that excite everyone—your total earnings before anything is taken out. How to read your first pay stub requires understanding that gross pay is not what you actually keep.

    What Gross Pay Includes

    Gross pay represents the total amount you earned during the pay period . For hourly employees, this section shows your hourly rate multiplied by regular hours worked . Overtime pay appears separately, usually calculated at 1.5 times your regular rate . Salaried employees see a fixed portion of their annual salary for the pay period .

    Additional Earnings

    If you received any bonuses, commissions, or reimbursements during the pay period, they appear here as separate line items . Some pay stubs also show tips, shift differentials, or various allowances . All these add up to your total gross pay.

    Current vs. Year-to-Date

    Most pay stubs display gross earnings for the current pay period and the year-to-date (YTD) total . YTD figures accumulate from January 1 through the current pay period . Tracking YTD helps you monitor your annual income progress.

    Section 4: Taxes and Deductions

    This is where how to read your first pay stub gets really important. Taxes and deductions explain the gap between gross pay and net pay. These fall into two main categories: mandatory and voluntary .

    Mandatory Federal Taxes

    Federal income tax is withheld based on your W-4 form information . The amount depends on your earnings, filing status, and number of allowances . If too much is withheld, you get a refund in April. If too little is withheld, you may owe money when filing taxes .

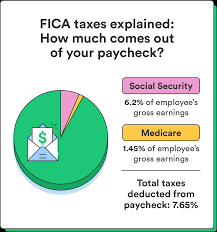
    FICA Taxes (Social Security and Medicare)

    You will see FICA (Federal Insurance Contributions Act) taxes listed separately or combined . Social Security tax is 6.2% of your gross earnings, up to an annual wage base limit . For 2024, that limit is $168,600 . Medicare tax is 1.45% of all your earnings, with no wage limit . High earners may see an additional 0.9% Medicare tax on wages exceeding $200,000 . Your employer matches these contributions, but you only see your portion deducted .

    State and Local Taxes

    Most states require state income tax withholding, which appears as another line item . Some states have no income tax, while others have flat or progressive rates . Certain cities and counties also impose local income taxes . The amount varies based on where you live and work.

    Pre-Tax Voluntary Deductions

    Pre-tax deductions are subtracted from your gross pay before income taxes are calculated, reducing your taxable income . Common pre-tax deductions include:

    • Health insurance premiums: Your share of medical, dental, or vision coverage
    • 401(k) retirement contributions: Money you save for retirement, often with employer matching
    • Health Savings Account (HSA) or Flexible Spending Account (FSA): Pre-tax funds for medical expenses
    • Dependent Care FSA: Pre-tax dollars for childcare expenses

    These deductions lower your tax bill now while providing valuable benefits.

    Post-Tax Voluntary Deductions

    Post-tax deductions are withheld after taxes are calculated and do not reduce your taxable income . Examples include:

    • Roth 401(k) contributions: Retirement savings with after-tax dollars, offering tax-free withdrawals later
    • Life insurance premiums: Additional coverage beyond employer-provided basics
    • Union dues: Fees for union membership
    • Charitable donations: Contributions to nonprofits through payroll

    Court-Ordered Deductions

    In some cases, you may see deductions for wage garnishments, child support, or alimony . These are mandated by court order and withheld from your pay automatically .

    Understanding Deduction Codes

    Pay stubs use abbreviations that can confuse anyone learning how to read your first pay stub. Here are common codes :

    CodeMeaning
    FED, FIT, FWTFederal income tax withholding
    STATE, SIT, SWTState income tax withholding
    FICAFederal Insurance Contributions Act
    SOC, SS, SOCSECSocial Security tax
    MEDMedicare tax
    401(K) or RETRetirement contributions
    INSHealth insurance premium
    GARNGarnished wages
    CHSPPRTChild support

    Section 5: Net Pay

    Finally, we reach the number that actually lands in your bank account. How to read your first pay stub culminates in understanding net pay.

    What Net Pay Represents

    Net pay, also called take-home pay, is the amount remaining after subtracting all taxes and deductions from your gross pay . This is the money you can spend, save, or invest. Your net pay should exactly match the direct deposit amount or the value of your paper check .

    Current and Year-to-Date Net Pay

    Like gross pay, net pay typically shows figures for the current pay period and year-to-date . YTD net pay helps you track your actual accumulated earnings for the year.

    Why Net Pay Matters for Budgeting

    Financial experts agree: base all your spending decisions on your net pay, not your gross salary . If you budget using gross pay, you will overspend because that money is not actually available. Learning how to read your first pay stub teaches you to work with your real take-home amount.

    Why You Must Verify Your Pay Stub Regularly

    Understanding how to read your first pay stub is not just about curiosity—it protects your wallet.

    Catch Errors Early

    Payroll mistakes happen. Your hours might be entered incorrectly, your tax code might be wrong, or benefit deductions might not match what you selected . Reviewing every pay stub when you start a new job, and periodically thereafter, helps you catch these errors quickly . If you spot a discrepancy, contact your HR or payroll department immediately .

    Verify Tax Withholdings

    Major life events like marriage, divorce, or having a child change your tax situation . After updating your W-4, check your pay stub to ensure the new withholding took effect . This prevents surprises at tax time.

    Proof of Income for Loans and Rentals

    When you apply for a mortgage, car loan, or apartment lease, lenders and landlords often request recent pay stubs as proof of income . They want to verify your earnings are stable and sufficient. Keeping your pay stubs organized makes these applications smoother .

    Track Progress Toward Financial Goals

    Your pay stub shows year-to-date earnings and deductions, helping you monitor your income and retirement savings progress . If you are aiming to max out your 401(k) contribution, YTD figures tell you how close you are.

    Common Questions About Reading Pay Stubs

    Why is my net pay so much lower than my gross pay?

    The difference comes from mandatory taxes (federal, state, FICA) and any voluntary deductions you chose (health insurance, retirement, etc.) . This is normal and happens to every employee. Learning how to read your first pay stub helps you see exactly where each dollar went.

    What if I do not understand a deduction?

    Start by asking your HR or payroll department . They can explain what each deduction covers and confirm it is correct. If the issue involves legal matters like garnishments, you may need to consult a wage and hour attorney .

    Do independent contractors get pay stubs?

    Independent contractors typically do not receive pay stubs from clients because they handle their own taxes and invoicing . However, contractors can generate their own pay stubs using templates to track earnings and provide proof of income for loans .

    How long should I keep pay stubs?

    Keep your pay stubs until you receive your W-2 at year-end and verify the information matches . After that, retain them for tax purposes or as proof of income. Many experts recommend keeping digital copies for at least three years.

    Conclusion

    Learning how to read your first pay stub transforms a confusing document into a valuable financial tool. You now understand that your pay stub contains five key sections: personal information, pay period, gross earnings, taxes and deductions, and net pay. Gross pay is your total earnings before anything is removed. Mandatory taxes fund federal, state, and local governments plus Social Security and Medicare. Voluntary deductions pay for benefits you chose, like health insurance and retirement savings. Net pay is the amount you actually take home and should use for budgeting.

    Review every pay stub carefully when you start a new job and periodically thereafter. Verify your personal information, check that hours and pay rates are correct, and ensure deductions match your elections. Catching errors early protects your income and prevents headaches later. Your pay stub also serves as proof of income for major life purchases like homes and cars.

    Now you have the knowledge to approach your next payday with confidence. No more confusion—just clarity about where your money comes from and where it goes. For more detailed guides on personal finance, career development, and managing your money wisely, visit evdrivetoday.com.

    Now it is your turn! What was the most surprising deduction on your first pay stub? Did anything catch you off guard? Share your experience in the comments below. Your story might help another first-time employee understand their own pay stub better.

  • What is FICA? Social Security and Medicare for Beginners

    What is FICA? Social Security and Medicare for Beginners

    What is FICA? This active guide explains Social Security and Medicare taxes for beginners. Learn how much you pay, why, and what benefits you earn.

    Introduction

    If you have ever looked at your paycheck and wondered where a chunk of your money went, you are probably asking what is FICA? That abbreviation stands for the Federal Insurance Contributions Act, and it is the law that requires money to be taken out of your pay for Social Security and Medicare . For beginners, understanding what is FICA is the first step to understanding your pay stub and your future benefits.

    These taxes fund two massive programs that almost all Americans rely on later in life. Social Security provides retirement, disability, and survivor benefits, while Medicare helps with health insurance costs for people 65 and older . This guide breaks down what is FICA in simple terms so you know exactly where your money goes and what you get in return. Let us dive into the details.

    What Is FICA and Why Does It Exist?

    To put it simply, what is FICA? It is a federal payroll tax that both employees and employers pay to fund Social Security and Medicare . Congress created this system so that working Americans collectively support the elderly, disabled, and survivors of deceased workers . When you see FICA on your pay stub, it represents your contribution to this social safety net. The government does not keep your money in a personal account for you. Instead, today’s workers pay for today’s beneficiaries, a system called “pay-as-you-go” . Understanding what is FICA helps you see that you are not just losing money—you are investing in a system that will support you or your family when you need it most.

    The Two Parts of FICA: Social Security and Medicare

    When people ask what is FICA, the answer always has two parts. FICA combines Social Security taxes and Medicare taxes into one deduction on your paycheck .

    Social Security (OASDI)

    Social Security is technically called Old-Age, Survivors, and Disability Insurance (OASDI) . This part of FICA provides monthly payments to:

    • Retired workers who have paid into the system
    • Families of workers who have passed away
    • People who cannot work due to disabilities

    Your Social Security number tracks your lifetime contributions so the government knows what benefits you have earned . The Social Security portion of FICA makes up the larger chunk of what you pay.

    Medicare (HI)

    The second part of what is FICA involves Medicare, specifically Medicare Part A, which covers hospital insurance . This helps pay for:

    • Inpatient hospital stays
    • Skilled nursing facility care
    • Hospice care
    • Some home health services

    Medicare taxes fund health coverage for Americans 65 and older, plus younger people with certain disabilities . Unlike Social Security, there is no cap on wages subject to Medicare tax .

    FICA Tax Rates for Employees

    So, what is FICA going to cost you from every paycheck? For employees, the total FICA tax rate is 7.65% of your gross wages . This breaks down into two specific rates:

    Social Security Portion (6.2%)

    Your employer withholds 6.2% of your gross pay for Social Security taxes, up to an annual wage base limit . For 2026, that limit is $184,500 . This means you only pay Social Security tax on the first $184,500 you earn in 2026. Any money you earn above that amount is not subject to the Social Security portion of FICA for the rest of the year .

    Medicare Portion (1.45%)

    The Medicare tax rate is 1.45% of all your gross wages, with no income limit . Every dollar you earn gets this 1.45% taken out for Medicare.

    Example Calculation

    If you earn $2,000 in a biweekly pay period, here is what is FICA taking from your check:

    • Social Security: $2,000 × 6.2% = $124
    • Medicare: $2,000 × 1.45% = $29
    • Total FICA withheld: $153

    Your employer matches every dollar you pay, contributing another $153 on your behalf . That matching contribution is part of your total compensation package, even though you never see it in your paycheck.

    FICA for High Earners: Additional Medicare Tax

    For beginners learning what is FICA, the Additional Medicare Tax can be confusing. High earners pay an extra 0.9% on top of the regular 1.45% Medicare tax . This additional tax applies once your earnings exceed certain thresholds:

    • Single filers: $200,000
    • Married filing jointly: $250,000
    • Married filing separately: $125,000

    Unlike regular Medicare tax, employers do not match this additional 0.9%. It is paid entirely by the employee . If you earn enough to trigger this tax, your total Medicare withholding becomes 2.35% on earnings above the threshold . Understanding what is FICA at higher income levels helps you plan for accurate withholding.

    FICA for Self-Employed Individuals

    If you work for yourself, understanding what is FICA changes slightly. Self-employed people pay Self-Employment Contributions Act (SECA) tax instead of FICA . The total rate is 15.3% of your net earnings, which combines:

    • 12.4% for Social Security (up to the wage base limit)
    • 2.9% for Medicare (all earnings)

    Because you are both employee and employer, you pay both halves of the tax. However, you can deduct the employer-equivalent portion (half of the total) when calculating your adjusted gross income on your tax return . This deduction reduces your income tax burden but does not reduce your self-employment tax itself .

    For 2026, if you are self-employed, you will pay:

    • 12.4% Social Security tax on the first $184,500 of self-employment income
    • 2.9% Medicare tax on all income up to the Additional Medicare Tax threshold
    • 3.8% Medicare tax (2.9% + 0.9%) on income above the threshold

    What You Get in Return for Paying FICA

    Understanding what is FICA means also understanding what benefits you earn. This is not just money disappearing—it is buying you future security.

    Social Security Benefits

    Your FICA contributions qualify you for:

    • Retirement benefits: Monthly income starting as early as age 62, with larger payments if you delay up to age 70
    • Disability benefits: Income if you become unable to work due to a qualifying disability
    • Survivor benefits: Payments to your family members if you pass away

    The Social Security Administration calculates your benefit based on your highest 35 years of earnings, indexed for inflation . Higher lifetime earnings generally mean higher monthly benefits, up to a maximum amount.

    Medicare Benefits

    Paying Medicare taxes through FICA earns you Medicare Part A coverage with no monthly premium when you turn 65, provided you or your spouse worked at least 10 years . Part A covers:

    • Inpatient hospital care
    • Skilled nursing facility care (limited duration)
    • Hospice care
    • Some home health services

    Most people do pay a monthly premium for Medicare Part B (doctor visits and outpatient care), which is separate from FICA taxes . The Part B premium for 2026 is $202.90 per month .

    FICA Wage Base Limits

    One key part of what is FICA involves the Social Security wage base. This limit changes nearly every year based on national wage trends .

    2026 Social Security Wage Base

    For 2026, the Social Security wage base increased to $184,500, up from $176,100 in 2025 . This means:

    • You pay 6.2% Social Security tax on the first $184,500 you earn in 2026
    • Once your year-to-date earnings hit $184,500, Social Security withholding stops for the rest of the year

    No Limit for Medicare

    Unlike Social Security, the Medicare portion of FICA has no wage base limit . You pay 1.45% on every dollar you earn throughout the year, no matter how much that totals.

    If You Have Multiple Jobs

    If you work multiple jobs, each employer withholds Social Security tax as if that job were your only income . This can result in over-withholding if your combined earnings exceed the wage base. When you file your tax return, you get credit for any excess Social Security taxes withheld . This is an important detail when understanding what is FICA in complex employment situations.

    FICA Exemptions: Who Doesn’t Pay?

    Not everyone pays FICA taxes. Certain groups qualify for exemptions, which is important to know when learning what is FICA .

    Common Exemptions Include:

    • Students: Students enrolled at least half-time and employed by their school may be exempt from FICA on that income . At West Virginia University, for example, undergraduate students taking 6+ credit hours in fall/spring are FICA-exempt, while graduate students need 5+ credit hours .
    • Nonresident Aliens: Foreign nationals in F-1 or J-1 status with nonresident alien tax status are exempt from FICA on wages from employment related to their visa purpose .
    • Religious Groups: Members of certain religious sects opposed to insurance may qualify for exemption .
    • Some State/Local Government Employees: Certain public employees covered by alternative retirement systems may not pay Social Security taxes.

    If you qualify for an exemption, your employer must apply it automatically . You do not need to take action, though you should verify your pay stub shows no FICA withholding if you believe you qualify.

    How to Verify Your FICA Withholding

    Now that you understand what is FICA, you should check your pay stub to ensure correct withholding.

    What to Look For

    On your pay stub, look for line items like:

    • “FICA,” “SS,” or “Social Security” showing 6.2% withholding
    • “MED” or “Medicare” showing 1.45% withholding
    • Year-to-date totals to track when you approach the Social Security wage base

    Catch Errors Early

    Payroll mistakes happen. Your employer might use the wrong tax code, miscalculate your wages, or fail to stop Social Security withholding after you hit the wage base. Reviewing every pay stub when you start a new job and periodically thereafter helps you catch errors quickly . If something looks wrong, contact your HR or payroll department immediately.

    Track Your Future Benefits

    You can create a my Social Security account online to see your lifetime earnings record and estimated future benefits . This shows you exactly how your FICA contributions translate into future security. It is a powerful motivator to keep paying into the system.

    Common Questions About FICA

    Is FICA the same as federal income tax?

    No. FICA is separate from federal income tax withholding . Income tax funds general government operations, while FICA specifically funds Social Security and Medicare. Your pay stub shows them as separate deductions.

    Can I opt out of paying FICA?

    Generally, no. FICA is mandatory for almost all workers . The only exceptions are specific exemption categories listed earlier. You cannot choose to stop paying even if you do not plan to collect benefits later.

    What if my employer does not withhold FICA?

    Employers are legally required to withhold FICA taxes . If your employer does not, they are breaking the law, and you may owe the taxes yourself when you file your return. Report this to the IRS.

    Do I pay FICA on tips?

    Yes. Tips are considered wages and are subject to FICA withholding . If you receive $20 or more in tips per month, you must report them to your employer so taxes can be withheld.

    Why is my FICA different from my coworker’s?

    FICA percentages are the same for everyone, but actual dollar amounts depend on your wages . If you earn more, you pay more in FICA taxes, up to the Social Security wage base. Once you hit that limit, your FICA withholding drops because Social Security stops, while your coworker still paying below the limit continues paying the full 6.2%.

    Conclusion

    Understanding what is FICA transforms a confusing deduction on your paycheck into a meaningful investment in your future. FICA stands for the Federal Insurance Contributions Act, and it funds Social Security and Medicare through payroll taxes . Employees pay 6.2% for Social Security (up to the annual wage base) and 1.45% for Medicare (on all wages), totaling 7.65% . Employers match this amount, and self-employed individuals pay the full 15.3% themselves but can deduct half . High earners pay an additional 0.9% Medicare tax on wages above certain thresholds .

    For 2026, the Social Security wage base increased to $184,500, meaning you only pay Social Security tax on the first $184,500 you earn . Medicare taxes apply to every dollar, with no cap . In return for these taxes, you earn retirement, disability, and survivor benefits through Social Security, plus hospital insurance coverage through Medicare when you turn 65 .

    Now you can look at your pay stub with confidence. You understand exactly where that money goes and what benefits you are building for the future. For more detailed guides on personal finance, taxes, and making the most of your money, visit evdrivetoday.com.

    Now it is your turn! Were you surprised by how much goes to Social Security versus Medicare? Did you know about the Additional Medicare Tax for high earners? Share your thoughts and questions in the comments below. Your questions might help another beginner understand what is FICA better.

  • How to Price Your Lawn Mowing Services

    How to Price Your Lawn Mowing Services


    Setting rates is tricky. This guide on how to price your lawn mowing services helps you charge fairly, win clients, and maximize your profits.

    One of the hardest parts of starting a landscaping business is knowing what to charge. This guide on how to price your lawn mowing services will take the guesswork out of the equation. If you charge too little, you work hard for almost no money. If you charge too much, you scare away potential customers. You need a “sweet spot” where clients feel they get value, and you feel fairly paid for your time and effort. Let us break down the factors that go into setting the perfect price.

    Why Pricing Matters So Much

    Pricing is not just about making money. It is about positioning yourself in the market. Low prices might attract customers initially, but they often attract the most demanding clients who do not value your work. Fair prices attract clients who respect your time and are willing to pay for quality.

    Your prices also communicate your professionalism. A clear, well-thought-out price list shows you are serious. It tells customers you have done your research. This builds trust before you even start the mower. Learning how to price your lawn mowing services correctly is the foundation of a sustainable business.

    Step 1: Know Your Costs: How to Price Your Lawn Mowing Services

    Before you can set a price, you need to know what the job costs you. This includes gas for the mower and trimmer. It includes the cost of maintaining your equipment, like sharpening blades and oil changes. Do not forget to factor in travel time to and from the property.

    If you use your own equipment, you should set aside a small amount from each job for future repairs or replacement. This is called a “sinking fund.” Many new business owners forget this step and end up unable to fix their mower when it breaks. Accounting for costs is the first rule in how to price your lawn mowing services for profit.

    Step 2: Research Your Local Market: How to Price Your Lawn Mowing Services

    You do not operate in a bubble. You need to know what other lawn care providers charge in your neighborhood. Look at local Facebook groups or community bulletin boards. Ask neighbors what they currently pay. You can even call a few local companies and ask for a quote on a hypothetical yard to gather data.

    Be careful not to just copy the lowest price you find. Established companies have higher overhead costs. As a solo operator, you can often charge slightly less and still make a great profit. However, undercutting everyone by a huge margin actually hurts the market and makes it hard for everyone to earn a living. Research gives you a solid baseline for how to price your lawn mowing services.

    Step 3: Decide Between Hourly or Per-Job Rates: How to Price Your Lawn Mowing Services

    You have two main choices for how to charge: by the hour or by the job. Each has pros and cons. Charging by the hour is simple. You track your time and multiply it by your rate. However, if you get faster with experience, you actually make less money per yard.

    Charging by the job is more common for lawn mowing. You quote a flat fee for the entire service. This rewards you for being efficient. If you finish a $40 yard in 30 minutes, you effectively earn $80 per hour. The key is accurately estimating how long a job will take. This decision is central to how to price your lawn mowing services.

    Step 4: Measure the Yard

    To quote a flat rate accurately, you need to assess the property. Look at the size of the lawn. Is it a small postage-stamp yard or a large, sprawling acre? Larger yards take more time and fuel, so they should cost more.

    Also, look at the shape and terrain. Is the yard flat or on a steep hill? Hills are harder work and take longer. Are there many obstacles like trees, flower beds, and fences? These require trimming and maneuvering, which adds to the time. A complex yard justifies a higher price. Measuring and assessing is a key skill in how to price your lawn mowing services.

    Step 5: Consider the Frequency: How to Price Your Lawn Mowing Services

    How often will you mow this lawn? Weekly clients are different from one-time cleanups. Weekly maintenance is faster because the grass is consistently short. You can charge a lower weekly rate because the work is predictable and efficient.

    One-time mows for overgrown grass are much harder. Long grass clogs the mower and takes extra time to bag. You should charge a premium for these jobs. Also, offering a slight discount for weekly contracts encourages clients to book you regularly, giving you steady, predictable income. Frequency plays a big role in how to price your lawn mowing services.

    Step 6: Factor in Additional Services

    Your pricing should account for what is included. Does your price cover just mowing? Or does it include edging along sidewalks, trimming around trees, and blowing off the driveway? These “finishing touches” take extra time and effort.

    Be clear about what your base price includes. Then, you can offer add-ons for extra money. For example, you might charge extra for bagging grass instead of mulching. You might charge extra for weed whacking in hard-to-reach areas. Clearly defining services helps clients understand the value. It is a crucial part of how to price your lawn mowing services transparently.

    Step 7: Account for Your Experience Level: How to Price Your Lawn Mowing Services

    Be honest about your experience. If you are just starting out, you might charge on the lower end of the market range. This attracts initial clients while you learn and build a portfolio. Once you have proven yourself and have happy customers, you can raise your rates.

    As you gain experience, you also get faster and more efficient. You learn to spot problems before they happen. This expertise is valuable. Experienced professionals at Iowa State University Extension note that lawn care requires specific knowledge about grass types and cutting heights for optimal health . That knowledge is worth paying for. Experience should influence how to price your lawn mowing services.

    Step 8: Calculate Your Desired Hourly Rate

    Even if you charge by the job, you should think in terms of hourly earnings. Decide how much you want to make per hour. A good target for a teenager might be $20 to $30 per hour.

    Then, estimate how long a job will take. If a yard takes one hour and you want to make $25, your price should be at least $25 plus your costs. If you think you can do the same yard in 30 minutes once you are experienced, you could charge $20 and still make $40 per hour. Always calculate backward to ensure your flat rate meets your hourly goal. This math is essential for how to price your lawn mowing services profitably.

    Step 9: Create a Simple Price List

    Once you have your formula, write it down. Create a simple price list based on yard size. For example:

    • Small yard (under 1/4 acre): $30
    • Medium yard (1/4 to 1/2 acre): $45
    • Large yard (over 1/2 acre): $60+

    This list makes it easy to give quick quotes. It also looks professional. You can add notes about extra charges for hills or overgrown grass. Having a printed list (even on your phone) builds confidence when talking to potential clients. It shows you have mastered how to price your lawn mowing services.

    Step 10: Communicate Your Prices Clearly

    When giving a quote, be confident. State your price clearly and explain what it includes. If the customer hesitates, ask them what their budget is. You might be able to adjust the services offered to meet their needs. For example, you could mow every two weeks instead of weekly to lower the cost.

    Never apologize for your prices. If you provide good service, you deserve to be paid fairly. Clear communication prevents misunderstandings later. It ensures both you and the client are happy with the arrangement.

    Step 11: Handle Objections Professionally: How to Price Your Lawn Mowing Services

    Sometimes a client will say, “That is too expensive.” Do not immediately drop your price. Instead, ask why. They might be comparing you to a different level of service. Explain the value you provide: your reliability, your attention to detail, and the fact that you are insured (if you are).

    If you decide to negotiate, do not cut your price without cutting services. You could offer a smaller service package at a lower rate. For example, “I can do the mowing only for $35, but the edging and blowing will be extra.” This keeps your core value intact.

    Step 12: Review and Adjust Regularly

    Your prices are not set in stone. Review them every six months or once a year. As gas prices go up, you may need to raise your rates. As you gain more experience and great reviews, you should raise your rates.

    When raising prices for existing clients, give them plenty of notice. Explain that due to increased costs or your growing experience, your rates are adjusting. Most loyal clients will understand if you have provided good service. Regular reviews keep your business healthy and profitable.

    Common Pricing Mistakes to Avoid

    Avoid these pitfalls when setting your rates. First, do not undervalue your time. Your time is worth money. Second, do not forget to charge for travel. If you drive 20 minutes to a yard, that is time and gas you are not getting paid for.

    Third, do not be afraid to say no. If a client wants a price that is too low, it is okay to walk away. That client would likely be unhappy and demanding anyway. Focusing on good clients at fair prices builds a better business.

    Conclusion

    Setting the right price is a blend of math, research, and confidence. You need to cover your costs, pay yourself fairly, and offer value to the customer. By following these steps, you can create a pricing structure that works for everyone. It ensures your hard work in the sun translates into real profit.

    For more tools to help you manage your lawn care business, including invoice templates and expense trackers, be sure to visit evdrivetoday.com. We have resources to help you grow.

    Now, we want to hear from you! What is the biggest challenge you face when quoting prices for lawn jobs? Drop a comment below and share your experience with our community.

  • 1. Selling Notes Online: A Legit Way to Earn Money in College?

    1. Selling Notes Online: A Legit Way to Earn Money in College?


    Can you really make money from your class notes? Find out if Sellling notes online: a legit way to earn money in college? is true and how to start safely.

    If you are a college student looking for flexible income, you have likely wondered about Selling notes online: a legit way to earn money in college? The short answer is yes, it can be legitimate. Many students turn their detailed class notes into a profitable side hustle. But you need to understand the rules. You must navigate copyright laws, platform policies, and your own school’s academic integrity code. This guide explores the entire process, helping you decide if this income stream is right for you.

    The Rise of the Note-Taking Economy:Selling Notes Online: A Legit Way to Earn Money in College?

    The internet has changed how students study. Platforms like Stuvia, Nexus Notes, and Course Hero have created marketplaces for academic materials. Students who take excellent notes can upload them for sale. Other students, who missed class or want a study aid, can buy them.

    This creates a sharing economy within education. It rewards students who are organized and diligent. But it also raises questions about ethics and legality. Before diving in, you must understand the landscape. This article answers the core question: Sellling notes online: a legit way to earn money in college? We will look at the opportunities and the pitfalls.

    How Note-Selling Platforms Work: Selling Notes Online: A Legit Way to Earn Money in College?

    Most platforms operate similarly. You sign up for a free account. You upload your notes, study guides, or summaries. You set a price, usually between $3 and $15 per document. The platform hosts the file and processes payments.

    When a student buys your notes, the platform takes a commission. This can range from 30% to 60% of the sale price . Some sites offer higher royalties for exclusive content. Others pay you a percentage of every sale forever. Understanding these terms is crucial. You work hard on your notes; you deserve fair compensation.

    Is It Actually Legal?

    This is the most important question. Selling notes online: a legit way to earn money in college? Legality depends on several factors. First, you must own the content you create. Your class notes are generally considered your intellectual property. You wrote them. You typed them.

    However, you cannot sell materials that belong to the professor or the university. This includes the professor’s PowerPoint slides, their lecture recordings, or their published handouts. You can only sell your own interpretation and summary of that information. The University of Minnesota’s academic integrity office warns that using a professor’s copyrighted material without permission is a violation . Keep your notes original.

    Copyright vs. Academic Integrity

    Even if your notes are legal, they might violate your school’s code of conduct. Many universities have strict policies against selling course materials. They consider it “academic misconduct” or “unauthorized distribution.”

    For example, if a professor posts slides on the class portal, those slides are for enrolled students only. Sharing them publicly breaks that trust. Some schools have punished students for uploading materials to these sites. Always read your student handbook. You must know the rules before you risk your academic standing. This is a critical part of evaluating selling notes online: a legit way to earn money in college?

    Choosing the Right Platform

    Not all note-selling sites are equal. Some are reputable and pay well. Others have confusing terms or low traffic. Here are a few popular options:

    • Stuvia: Popular in the UK and Europe. You earn 80% commission on your sales. They have a large marketplace for nursing and medical students .
    • Nexus Notes: An Australian platform. They focus on university-level notes. You can set your own prices.
    • Course Hero: A US-based giant. They have a different model. You upload notes to earn ” unlocks” for other documents, rather than direct cash .
    • OneClass: They pay upfront for high-quality notes. You get paid per page, but they keep the rights to your content.

    Research each platform’s terms before uploading anything.

    What Kind of Notes Sell Best?: Selling Notes Online: A Legit Way to Earn Money in College?

    Not every notebook page will make you money. To succeed, you need to understand demand. Students want notes that help them pass exams. Comprehensive study guides sell better than scattered daily notes.

    Subjects like biology, chemistry, accounting, and nursing are high-demand areas. They are complex and require detailed explanation. Notes that include diagrams, mnemonics, and summaries are popular. Clean, typed notes sell better than scanned handwritten pages. Organization and clarity are your best friends. Identifying demand is essential for selling notes online: a legit way to earn money in college?

    How to Create Notes That Sell

    If you want to earn, you must create a quality product. Do not just upload your messy raw notes. Polish them. Create a clear table of contents at the beginning. Use headings and bullet points for easy reading.

    Highlight key terms and definitions. Add practice questions with answers if you have them. Students pay for convenience. If your notes save them hours of textbook reading, they are valuable. Think of yourself as a publisher. You are creating a study aid, not just sharing a document. This mindset shift increases your earnings.

    Pricing Your Notes

    Pricing can be tricky. Look at what others are charging for similar courses. If you have the only notes available for a niche upper-level class, you can charge more. If the market is flooded with introductory psychology notes, you must price competitively.

    Start on the lower end to attract initial buyers and get reviews. Positive reviews build trust and lead to more sales. Once you have a reputation, you can raise your prices slightly. You can also bundle notes from multiple exams in one course for a higher price. Smart pricing maximizes your income.

    The Ethics of Selling Notes: Selling Notes Online: A Legit Way to Earn Money in College?

    Beyond legality, consider the ethics. Are you helping lazy students skip class? Or are you providing a legitimate study tool for struggling peers? The answer depends on how you frame your product.

    Good notes supplement learning. They do not replace attending lectures or reading the textbook. If your notes allow someone to pass a class without doing any work, that feels wrong. But if they help a student who learns differently or who missed a class due to illness, you are providing a valuable service. Reflect on your own intentions. This reflection is part of deciding selling notes online: a legit way to earn money in college? for you personally.

    Risks and Downsides

    There are real risks to this hustle. The biggest is violating your school’s honor code. If you are caught, you could face academic probation or even expulsion. Stanford University’s Office of Community Standards explicitly prohibits selling course materials for commercial purposes .

    There is also the risk of copyright claims from professors. If you include their exact wording or diagrams, they can issue a DMCA takedown. Your account could be suspended. You could even face legal action in extreme cases. Always err on the side of caution. Create your own content.

    How to Protect Yourself: Selling Notes Online: A Legit Way to Earn Money in College?

    You can take steps to minimize risk. First, never include the professor’s name or the specific course number in your public listing. This makes it harder for the university to find your notes.

    Second, rewrite everything in your own words. Paraphrase concepts. Create your own examples. Your notes should reflect your understanding, not a transcription of a lecture. Third, use a pseudonym online if the platform allows. This adds a layer of privacy. Protecting your academic career should be your top priority.

    Tax Implications

    If you make significant money, you need to think about taxes. In the US, platforms like Course Hero may send you a 1099 form if you earn over $600 in a year. This income is taxable.

    Keep track of your earnings. Set aside a small percentage for tax time. Consult with a parent or a tax professional if you are unsure. Treating your note sales as a real business from the start builds good financial habits. It is a key part of selling notes online: a legit way to earn money in college? when done professionally.

    Success Stories and Realistic Expectations

    Some students make thousands of dollars selling notes. They become top sellers on platforms and build a passive income stream. One nursing student on Stuvia reportedly earned over $150,000 from her study guides .

    However, this is rare. Most students earn a few hundred dollars per semester. It is a nice supplement to part-time work, not a replacement for a full-time job. Go in with realistic expectations. If you make a little extra spending money, consider it a success. If you hit the jackpot, even better.

    Alternatives to Selling Notes: Selling Notes Online: A Legit Way to Earn Money in College?

    If the risks feel too high, consider alternatives. You can become a paid tutor instead. You can offer editing services for other students’ papers. You can create study guides for local high school students.

    These options use your academic skills without the same ethical gray areas. They also provide direct interaction and teaching experience. Explore all your options before committing to the note-selling path.

    Conclusion

    So, back to the original question: selling notes online: a legit way to earn money in college? It can be, provided you navigate the legal and ethical challenges carefully. You must create original content, respect copyright, and understand your school’s policies. If you do it right, it offers a flexible way to earn passive income from work you are already doing.

    For more resources on managing your freelance income and balancing work with your studies, be sure to visit evdrivetoday.com. We have guides to help you succeed financially while in school.

    Now, we want to hear from you! Have you ever bought or sold notes online? What was your experience? Drop a comment below and share your story with our community.

  • How to Make Money with a 3D Printer (If Your School Has One)

    How to Make Money with a 3D Printer (If Your School Has One)

    Got access to a school 3D printer? Learn how to make money with a 3d printer (if your school has one) and turn classroom tech into real cash.

    If your school has a makerspace or tech lab with a 3D printer, you are sitting on a goldmine. This guide shows you how to make money with a 3d printer (if your school has one) without breaking any rules. Many schools now have these amazing machines, but they often sit idle after class. You can put that idle time to work. With permission and a smart plan, you can turn plastic filament into products people want to buy. Let us walk through the entire process, from getting approval to making your first sale.

    Why School 3D Printers Are a Hidden Opportunity

    School 3D printers are expensive. A decent machine costs hundreds or even thousands of dollars . Your school already paid for it. The filament, the electricity, and the maintenance are covered. For you, this means zero startup costs.

    You also have access to software and teacher expertise. Your tech ed or art teacher can help you learn design skills. This is a huge advantage over someone trying to learn alone at home. Using school resources gives you a head start. Understanding how to make money with a 3d printer (if your school has one) means leveraging what is already available to you.

    Real Teens Who Made It Big

    Before we dive into the steps, know that this works. Other students have turned 3D printing into serious money. Michael Satterlee started in a high school class learning CAD modeling. Today, he runs over 130 printers and made $300,000 in a single month . A college team in China started by selling 3D printed dragons at a temple fair. They made over $11,000 in just four days . These are real examples. They prove that starting young with school resources can lead to big things.

    Step 1: Get Proper Permission

    You cannot just walk in and start a business. Schools have rules. You must follow them. Every school makerspace has guidelines you need to review . Start by talking to the teacher in charge. Explain your idea respectfully. Ask what is allowed.

    You may need to sign a liability waiver. Many schools require this before anyone uses equipment . If you are under 18, your parent will likely need to sign too . Be prepared to show that you understand safety rules. Schools worry about students getting hurt or breaking machines. Show them you are responsible. This first step is essential for how to make money with a 3d printer (if your school has one) legally and safely.

    Step 2: Learn the Basics of 3D Printing

    Before you sell anything, you must master the machine. Most school printers are FDM (Fused Deposition Modeling) printers. They melt plastic filament and build objects layer by layer . FDM is perfect for beginners because it is simple and uses cheap materials .

    Learn the software. You need to know CAD (Computer-Aided Design) to create your own models. Free programs like Tinkercad are great for starting. Also learn the slicing software that turns your design into printer instructions. Your teacher can help you with this. Take the training seriously. Some schools require a test before you can use equipment alone . Passing that test is your ticket to independence.

    Step 3: Understand What Sells

    Not every print is worth selling. You need products people actually want. Look at what sells on Etsy and Amazon. Popular items include:

    • Cosplay props and accessories
    • Tabletop gaming miniatures
    • Phone stands and desk organizers
    • Jewelry and earrings
    • Custom lithophanes (3D printed photos)
    • Fidget toys and puzzles

    Think about your audience. Fellow students might buy cool keychains or game pieces. Teachers might buy desk organizers. Parents might buy personalized ornaments. Identifying demand is key to how to make money with a 3d printer (if your school has one) .

    Step 4: Start with Small, Simple Products

    Do not try to print a life-sized Iron Man suit on day one. Start small. Keychains take 20 minutes and use almost no filament. You can sell them for $5 each. That is a huge profit margin since filament costs about $20-30 per kilogram .

    Phone stands are another easy starter. They print in an hour or two and sell for $10-15. Bookmarks, earrings, and small toys are also good options. Small prints let you practice quality control. You learn to spot problems before they ruin a big job. Master the small stuff first.

    Step 5: Price Your Products Correctly

    Pricing can be tricky. You want to make money, but you also want sales. Start by calculating your costs. Even though the school provides filament, you should factor in its value. A typical spool of PLA filament costs $20-30 and holds about 330 meters . A small keychain might use 5 meters. That is about 30 cents of material.

    Then add your time. Decide what your hourly rate should be. $15-20 per hour is reasonable for a beginner. If a print takes 30 minutes and uses 50 cents of filament, your cost is around $8. You could sell it for $12-15 and make a nice profit. Research what similar items sell for online. Price competitively but do not undervalue your work.

    Step 6: Offer Customization

    Custom products sell for more money. Offer to print people’s names on keychains. Make custom photo lithophanes for Mother’s Day gifts. Create personalized game pieces for D&D players.

    Customization requires you to learn design skills. You need to modify existing models or create new ones from scratch. This takes time but pays off. People love unique items made just for them. Custom work is a huge part of how to make money with a 3d printer (if your school has one) successfully.

    Step 7: Understand Intellectual Property

    This is important. You cannot just download any file from the internet and sell prints. Many designs have licenses that forbid commercial use. Some are for personal use only. Respect the creator’s rights.

    If you want to sell prints of someone else’s design, check the license. Look for “commercial use allowed” or contact the designer for permission. Better yet, create your own original designs. This avoids legal trouble entirely. Lucas Osborn, a law professor, explains that 3D printing raises complex intellectual property questions . Stay safe by being original. Always ask permission when unsure.

    Step 8: Market to Your School Community

    Your first customers are right around you. Fellow students, teachers, and staff are an easy market. Put up posters (with permission) advertising your products. Show samples at lunch or after school. Word spreads fast in a school.

    Create an Instagram account for your business. Post photos of your best prints. Use hashtags like #3Dprinting and #smallbusiness. Tag your school if allowed. Teachers might share your posts. This free marketing reaches parents and neighbors too. Leveraging your school community is smart strategy for how to make money with a 3d printer (if your school has one) .

    Step 9: Take Orders Professionally

    When someone wants to buy, handle it professionally. Write down their name, contact info, and exactly what they want. Agree on a price upfront. Collect payment before you print. For custom work, require a deposit.

    Set clear expectations. Tell them how long printing takes. Explain that 3D prints have visible layer lines and are not perfectly smooth like injection-molded plastic. Managing expectations prevents disappointment. Happy customers come back and tell their friends.

    Step 10: Handle Volume and Scheduling

    School printers are shared resources. You cannot monopolize them. Work with your teacher to schedule print time. Maybe you print after school or during free periods. Be respectful of others who need the machine.

    If demand grows, look for solutions. Could you print overnight? Could you use multiple printers? Some schools have several machines. Ask if you can use idle printers during breaks. The more you can print, the more you can sell. Managing volume is part of scaling up.

    Step 11: Maintain Quality Control

    Bad prints ruin your reputation. Check each print carefully before giving it to a customer. Look for:

    • Layer shifting or misalignment
    • Stringing (thin plastic strands)
    • Poor adhesion to the bed
    • Missing layers or gaps

    If a print fails, do not sell it. Start over. Your reputation depends on delivering quality. One bad product can lose you multiple customers. Take pride in your work. Quality control separates hobbyists from real businesses.

    Step 12: Track Your Finances

    Keep records. Write down every sale, every expense, and every hour you work. Even if you are just using school filament, track its value. This helps you understand your profit margins.

    If you make significant money, talk to your parents about taxes. In the US, you may need to report income. Good records make tax time easy. They also show you which products are most profitable. Use this data to focus on what sells best. Smart tracking is essential for how to make money with a 3d printer (if your school has one) long-term.

    Step 13: Expand Your Skills

    Once you master basic FDM printing, learn more. Resin printers create much finer detail . They are perfect for miniatures and jewelry. If your school has one, get trained on it.

    Learn advanced design software. Fusion 360 and Blender open up new possibilities. The more you can design, the more unique products you can offer. Continuous learning keeps your business fresh and exciting. It also makes you more valuable to future employers.

    Step 14: Give Back to the School

    Remember that you are using school resources. Show appreciation. Offer to help younger students learn the printer. Volunteer to maintain the machines. Print replacement parts for classroom equipment for free.

    When teachers see you giving back, they will support you more. They might let you use the printer during summer break. They might recommend you to other staff. Being a positive part of the school community builds goodwill. It makes everyone excited about your success.

    Step 15: Plan for the Future

    Think beyond high school. The skills you learn now can lead to college opportunities and careers. Universities love students who started businesses. The University of Missouri even has a competition where students pitch 3D printing ideas and win funding .

    Your experience proves you are self-motivated and technically skilled. It looks amazing on college applications. It can lead to internships and job offers. What starts as a small side hustle could become your future career.

    Common Mistakes to Avoid

    Learn from others’ errors. Do not skip permission. Do not sell copyrighted characters without a license. Do not overpromise on delivery times. Do not ignore maintenance needs. Do not forget to communicate with customers.

    Also, do not try to do everything alone. Ask teachers for help. Connect with other students who print. Join online communities. The 3D printing world is full of people who love to share knowledge. Use that resource.

    Conclusion

    Your school’s 3D printer is more than a classroom tool. It is a path to earning money, learning skills, and building a business. By following the rules, mastering the machine, and creating products people want, you can turn plastic filament into profit. Start small, stay focused, and watch your side hustle grow.

    For more resources on managing your small business and balancing work with school, be sure to visit evdrivetoday.com. We have guides to help you succeed financially.

    Now, we want to hear from you! Does your school have a 3D printer? What would you make first? Drop a comment below and share your ideas with our community.

  • The Pros and Cons of Online Surveys for Teens

    The Pros and Cons of Online Surveys for Teens


    Thinking of taking surveys for cash? Read this honest guide on the pros and cons of online surveys for teens before you sign up for anything.

    If you are looking for a simple way to make money from your phone or laptop, you have probably seen ads for paid surveys. This article breaks down the pros and cons of online surveys for teens so you can decide if it is worth your time. Survey companies want opinions from young people. They pay cash or gift cards for your feedback. It sounds easy, and sometimes it is. But there are also downsides you need to know. Let us look at both sides honestly so you can make an informed choice.

    What Are Paid Online Surveys?:The Pros and Cons of Online Surveys for Teens

    Companies spend billions each year on market research. They need to know what young people like, buy, and think. Online surveys are one way they collect this data . You sign up with a survey company. They send you questionnaires about products, ads, or habits. You answer honestly. They pay you a small amount for each completed survey.

    For teens, this seems perfect. You can do it from home. You do not need any special skills. You work whenever you want. But before you jump in, understanding the pros and cons of online surveys for teens helps you set realistic expectations.

    The Pros: Why Teens Try Online Surveys

    Let us start with the good stuff. There are real reasons why millions of people, including teens, take surveys.

    1. It Is Flexible and Easy

    You can take surveys anytime. After homework, on weekends, or during summer break. You do not need to clock in at a specific time. You just log in and see what is available. This flexibility is perfect for busy students.

    2. No Experience Needed: The pros and cons of online surveys for teens

    You do not need a resume or references. You do not need special training. If you can read and have an opinion, you qualify. Survey companies want regular people, not experts. This makes it one of the most accessible ways to earn.

    3. You Get a Say in Products

    Your opinions actually matter. Companies use survey data to create new products and ads . When you tell a cereal company you hate a flavor, they might change it. You influence the market. That feels pretty cool.

    4. It Can Be Done Anywhere: The Pros and Cons of Online Surveys for Teens

    All you need is a device with internet. Phone, tablet, laptop, it all works. You can take surveys in your room, at the library, or even on a bus. Location does not matter.

    5. Low Commitment

    If you get busy with exams, you just stop. There is no boss to call. No shifts to cover. You control your participation completely. This low-pressure environment appeals to many teens.

    The Cons: The Reality You Need to Know:The Pros and Cons of Online Surveys for Teens

    Now for the other side. The pros and cons of online surveys for teens includes some significant drawbacks. Be honest with yourself about these.

    1. The Pay Is Very Low

    This is the biggest complaint. Surveys pay pennies per minute. A 20-minute survey might pay $1 or $2 . Some pay even less. You will not get rich. You might earn enough for a pizza or a movie ticket, but not a car payment.

    2. You Might Not Qualify

    Survey companies look for specific demographics. They might need left-handed teens who drink soda. If you do not fit the profile, you get screened out. You spend five minutes answering questions, then get a message saying “you do not qualify.” That time is wasted.

    3. It Can Be Boring: The pros and cons of online surveys for teens

    Answering question after question gets dull fast. Surveys ask repetitive things. “Rate this on a scale of 1 to 5.” “Which logo do you prefer?” Over and over. It is not exciting work.

    4. Privacy Concerns

    You share a lot of personal information. Age, location, income, shopping habits. Legitimate companies protect your data, but not all sites are trustworthy . You must be careful about where you sign up. Some sell your information to marketers, leading to more spam.

    5. Scams Are Everywhere: The Pros and Cons of Online Surveys for Teens

    The survey space is full of scams. Sites promise huge payouts but never pay. Others ask for credit card numbers or “registration fees.” Legitimate survey sites never charge you money . They pay you. Never pay to join.

    6. Minimum Payout Thresholds

    Most sites require you to earn a certain amount before you can cash out. This might be $10, $20, or even $50. If you only do a few surveys, it takes months to reach that. Your money sits there, inaccessible, for a long time.

    Legitimate Survey Sites for Teens: The Pros and Cons of Online Surveys for Teens

    Despite the cons, some sites are legitimate and worth your time. Here are a few that consistently pay real teens.

    Swagbucks

    Swagbucks is one of the most popular reward platforms. You earn points (called SB) for surveys, watching videos, and searching the web . Points redeem for PayPal cash or gift cards to places like Amazon and Walmart. They have been around for years and pay reliably.

    Survey Junkie

    Survey Junkie focuses only on surveys. You earn points for each completed survey. Once you reach 500 points ($5), you can cash out via PayPal or bank transfer . They are known for good customer service and fair screening.

    InboxDollars

    InboxDollars pays you for surveys, reading emails, and playing games . They pay in cash, not points. You get a $5 bonus just for signing up. The minimum payout is $30, which takes time but is achievable.

    Pinecone Research

    Pinecone Research is more exclusive. They pay well, often $3 to $5 per survey . They also send products to test at home. Getting accepted is harder, but if you do, it is one of the best options.

    KidzEar

    KidzEar is designed specifically for young people. It partners with brands wanting youth opinions. Surveys cover topics like toys, games, and snacks. It is a safe, teen-friendly environment.

    How to Spot a Survey Scam: The Pros and Cons of Online Surveys for Teens

    Knowing the pros and cons of online surveys for teens means knowing how to avoid scams. Here are red flags:

    • They ask for money: Legitimate sites never charge fees. If they want your credit card, run.
    • They promise huge earnings: “Make $500 a week taking surveys!” is a lie. Real surveys pay pocket money, not salaries.
    • They have no privacy policy: Legit sites explain how they use your data. If you cannot find a privacy policy, do not sign up.
    • They contact you out of the blue: Be suspicious of emails offering survey opportunities from companies you never joined.
    • Bad grammar and design: Professional companies have professional websites. Typos and broken links signal a scam.

    How Much Can You Really Make?: The Pros and Cons of Online Surveys for Teens

    Let us be real about money. Most teens earn between $20 and $100 per month with surveys . That is if they dedicate several hours a week. You might earn $1 to $3 per hour on average .

    Some months you earn more. Some months less. It depends on how many surveys you qualify for. Treat it as fun money, not income you rely on. That mindset keeps you from getting disappointed.

    Tips to Maximize Your Earnings: The Pros and Cons of Online Surveys for Teens

    If you decide surveys are for you, use these tips to earn more.

    Fill Out Your Profile Completely

    Survey sites match you with opportunities based on your profile. The more details you provide, the more surveys you qualify for. Be honest, but be thorough.

    Check Regularly

    Survey invitations go fast. If you check once a week, you miss most opportunities. Check daily, especially in the afternoon when new surveys drop.

    Use Multiple Sites

    Do not rely on just one. Sign up for three or four legitimate sites. This gives you more chances to find surveys you qualify for. Just track your logins so you do not forget passwords.

    Be Honest: The Pros and Cons of Online Surveys for Teens

    Do not lie to qualify for surveys. If you pretend to be older or have different interests, the data gets messed up. Companies also detect inconsistent answers. They might ban you from the site.

    Cash Out Frequently

    Once you reach the minimum payout, cash out. Do not let your balance sit there. Sites can change policies or even shut down. Get your money while you can.

    The Time vs. Reward Calculation: The Pros and Cons of Online Surveys for Teens

    Ask yourself: Is my time worth this? If you spend two hours to earn $3, that is less than minimum wage. You might be better off babysitting or mowing lawns.

    However, surveys fit into gaps in your day. You do them while watching TV or waiting for a ride. If you treat them as filler, not work, the low pay matters less. It is about using time you would otherwise waste.

    Protecting Your Privacy

    Safety matters. Never share your full name, address, or Social Security number on survey sites. Legitimate sites do not need that. They pay through PayPal or gift cards, which already have your info.

    Use a separate email address for survey sites. This keeps your main inbox free of spam. If a site asks for your phone number, think twice. You might get marketing texts.

    Talk to your parents before signing up anywhere. They can help you spot scams and manage any payments. Parental guidance is always smart.

    Are Surveys Better Than Other Side Hustles?: The Pros and Cons of Online Surveys for Teens

    Compare surveys to other teen jobs. Babysitting pays $15 to $20 per hour. Lawn mowing pays even more. Surveys pay $1 to $3 per hour. There is no comparison in earnings.

    But surveys require no physical effort. You do not leave your house. You do not deal with customers in person. For some teens, especially those with social anxiety or busy schedules, that trade-off is worth it. Only you can decide.

    The Psychological Impact

    There is also a mental side. Getting screened out of surveys over and over feels frustrating. You invest time and get nothing. That can be discouraging.

    Also, the work is mind-numbingly boring. If you need mental stimulation, surveys will not provide it. They are repetitive and dull. Know yourself before you commit.

    Success Stories vs. Reality

    You will read stories online of people making thousands from surveys. These are rare exceptions or outright lies. Most people earn spare change. If someone promises you a fortune, they are selling something.

    Real success looks like earning an extra $50 a month for video games or eating out. That is realistic. That is achievable. Celebrate those small wins.

    Conclusion

    So, after reviewing the pros and cons of online surveys for teens, what is the verdict? Surveys are a legitimate, flexible way to earn small amounts of money. They require no skills and fit around your schedule. But the pay is low, the work is boring, and scams are everywhere.

    If you go in with open eyes, use legit sites, and protect your privacy, surveys can provide some extra spending money. Just do not expect to get rich. Treat it as a fun way to earn a little cash in your spare time.

    For more resources on managing your side hustle income and finding better-paying opportunities, be sure to visit evdrivetoday.com. We have guides to help you succeed financially.

    Now, we want to hear from you! Have you tried online surveys? What was your experience? Drop a comment below and share your story with our community.

  • Is Babysitting a Good Job for You? A Beginner’s Guide

    Is Babysitting a Good Job for You? A Beginner’s Guide

    Thinking about childcare work? This guide answers is babysitting a good job for you? Learn the skills, risks, and rewards to decide today.

    If you are exploring ways to earn money, you might be wondering is babysitting a good job for you? This is a common question for young people entering the workforce. Babysitting is often the first job for many teens. It offers flexible hours and pays cash. But it also comes with real responsibility. You are caring for a family’s most precious members. This guide helps you decide if it fits your personality and goals. We will cover everything from required skills to handling emergencies.

    What Does a Babysitter Actually Do?

    At its core, babysitting means supervising children when parents are away. But the job involves much more than just being in the house. You might feed the kids, help with homework, or put them to bed. You also entertain them through games and activities.

    A good babysitter keeps the home safe and tidy. You might wash the dishes from dinner or pick up toys. The exact duties vary by family. Some parents just need you there while the kids sleep. Others need active engagement for several hours. Understanding these duties helps answer is babysitting a good job for you? If you enjoy helping others and staying active, it might be a perfect fit.

    The Pros of Babysitting: Is Babysitting a Good Job for You?

    There are many reasons why young people choose this path. First, the pay is often better than other entry-level jobs. You can earn $15 to $25 per hour depending on your location and experience . Plus, you usually get paid in cash at the end of the night.

    Second, the schedule is flexible. You can say no to jobs when you are busy with school or sports. You choose the families and hours that work for you. Third, you learn valuable life skills. Babysitting teaches responsibility, communication, and problem-solving. These skills look great on future resumes and college applications. For many, the answer to is babysitting a good job for you? is a clear yes because of these benefits.

    The Cons of Babysitting: Is Babysitting a Good Job for You?

    It is not always easy. Children can be unpredictable and challenging. A toddler might throw a tantrum the moment parents leave. A baby might cry for hours and you cannot figure out why.

    You also carry a heavy responsibility. Keeping a child safe is stressful sometimes. You have to stay alert and focused for long periods. The evenings can also be isolating. You might miss hanging out with friends while you are working. Parents also sometimes cancel last minute, leaving you without expected income. Being aware of these downsides helps you answer honestly is babysitting a good job for you?

    Essential Skills Every Babysitter Needs

    Not everyone is cut out for childcare. You need specific qualities to succeed. Patience is the most important skill. Kids test boundaries and make mistakes. You must stay calm and kind through it all.

    You also need basic first aid knowledge. Knowing what to do for cuts, falls, or fevers is crucial. The American Red Cross offers babysitting training courses that teach these skills . Communication is another key skill. You must talk clearly with both parents and children. You need to ask questions and report any issues accurately.

    How Old Should You Be?: Is Babysitting a Good Job for You?

    Age matters in babysitting. Most families prefer sitters who are at least 11 or 12 years old . But maturity matters more than a number. Some 13-year-olds are very responsible. Some 16-year-olds are not ready for the job.

    Consider your own maturity level. Can you handle a crying child without panicking? Can you follow rules exactly as parents give them? If you are younger, consider starting as a “mother’s helper.” This means you watch kids while the parent is still home. It gives you experience without full responsibility. Thinking about your readiness helps determine is babysitting a good job for you?

    Getting Trained and Certified: Is Babysitting a Good Job for You?

    Training makes you a better sitter and more attractive to parents. The American Red Cross offers a Babysitting Basics course . It covers leadership, safety, and child behavior. You also learn basic childcare skills like diapering and feeding.

    CPR certification is another huge plus. Knowing infant and child CPR can save a life. The American Heart Association provides these certification courses . Taking training shows parents you are serious and prepared. It also gives you confidence in your abilities. This preparation is essential for anyone asking is babysitting a good job for you?

    Finding Your First Babysitting Jobs

    Start with people you already know. Offer to watch younger siblings, cousins, or neighbors’ kids. Your family and friends can vouch for you. They know you are trustworthy.

    Once you have some experience, spread the word. Ask happy clients to recommend you to their friends. You can also create a simple profile on sites like Care.com or Sittercity. These platforms connect sitters with local families . Always involve your parents when using these sites. They should help you communicate with potential clients and review safety information.

    Setting Your Rates: Is Babysitting a Good Job for You?

    Money conversations can feel awkward, but you must discuss pay upfront. Research what other sitters in your area charge. Rates vary by location, experience, and number of kids.

    Start by asking parents what they typically pay. You can also state your rate clearly: “I usually charge $15 per hour for one child.” Be clear about extras. Do you charge more for late nights or watching multiple kids? Discussing money beforehand prevents misunderstandings. It is a professional habit that makes you look mature.

    What to Do During the Job: Is Babysitting a Good Job for You?

    Show up on time. This is non-negotiable. Being late shows disrespect for the family’s schedule. When you arrive, ask the parents to go over the routine. Ask about meals, bedtime, and any rules.

    Write down important information. Get the parents’ phone numbers and the address where they will be. Know where the first aid kit and fire extinguisher are located. Ask about allergies or medications. Taking notes shows you are paying attention. It helps you provide the best care possible.

    Handling Common Problems

    Kids cry. Kids fight. Kids refuse to go to bed. These are normal challenges. Stay calm and patient when they happen. Try distraction techniques. Offer a different toy or start a new game.

    If a child gets hurt, stay calm. Assess how serious it is. For minor scrapes, clean it and offer a bandage. For anything serious, call the parents immediately. If it is an emergency, call 911 first, then the parents. Knowing how to handle problems is key to answering is babysitting a good job for you?

    Keeping Kids Entertained

    Bored kids often get into trouble. Come prepared with activity ideas. Bring a book to read, simple crafts, or games. Ask the parents what the child enjoys.

    Limit screen time unless parents approve it. Active play is better for kids. Play hide and seek, build forts, or go outside if allowed. Engaging with kids makes the time pass faster for everyone. It also builds a positive relationship with the children.

    Safety Rules to Follow

    Safety is your number one job. Never leave young children unattended, even for a minute. Babies can roll off beds. Toddlers can climb and fall. Always keep eyes on the kids.

    Do not open the door for strangers. If someone comes to the door, do not let them in. Tell them the parents are busy. Do not share on social media that you are alone with kids. This protects both you and the children. Following these rules is essential for anyone asking is babysitting a good job for you?

    Building Long-Term Relationships

    Great babysitters become part of the family. When you do a good job, families will book you again and again. They might also recommend you to their friends.

    Build trust by being reliable and caring. Follow the parents’ instructions exactly. Leave the house as clean or cleaner than you found it. Send a quick text after the parents get home letting them know everything went well. These small actions build a great reputation.

    Is It Right for You?

    Only you can answer is babysitting a good job for you? Think about your personality. Do you like being around young children? Are you patient and calm under pressure? Can you handle responsibility?

    If you answered yes, babysitting could be a great fit. It offers good pay, flexible hours, and valuable experience. If you are unsure, try helping with younger relatives first. Get a feel for the job without the pressure. This trial run will help you decide.

    Conclusion

    Babysitting offers young people a real chance to earn money and learn responsibility. It teaches skills that last a lifetime. But it also requires patience, maturity, and a genuine care for children. By honestly assessing your own strengths and weaknesses, you can decide if this path is right for you.

    For more resources on starting your first job and managing your money, be sure to visit evdrivetoday.com. We have guides to help you succeed in your new venture.

    Now, we want to hear from you! Have you tried babysitting before? What was your experience like? Drop a comment below and share your story with our community.

  • Getting Started on Fiverr as a Teenager: What You Can Do

    Getting Started on Fiverr as a Teenager: What You Can Do


    Curious about freelancing? Here is a complete guide on getting started on Fiverr as a teenager: what you can do to earn money safely and legally.

    If you are a young person with skills to sell, this guide to getting started on Fiverr as a teenager: what you can do will answer all your questions. Fiverr is a popular online marketplace where people offer digital services, called “gigs,” starting at five dollars. The platform opens doors for creative and tech-savvy teens. However, there are specific rules you must follow. This article walks you through the process step by step, ensuring you stay safe, legal, and profitable.

    Understanding Fiverr’s Rules for Teens

    Before you sign up, you need to understand the platform’s requirements. Fiverr’s Terms of Service require all users to be at least 18 years old to own an account . However, if you are between 13 and 17, you can still use the site. The key is that a parent or legal guardian must own and manage the account . Users under 13 are strictly prohibited from using Fiverr for any reason .

    This policy exists to protect minors from potential risks like exploitation and financial issues . It also ensures that legally binding contracts are signed by an adult. So, when we talk about getting started on Fiverr as a teenager: what you can do, the very first step involves your parent or guardian.

    Why Fiverr is a Good Option for Teens: Getting Started on Fiverr as a Teenager

    Fiverr offers a unique opportunity for young people to build work experience early. It teaches you how to communicate with clients, manage deadlines, and market yourself. These are skills no classroom can fully teach . Unlike a traditional part-time job, freelancing lets you work from home on your own schedule.

    The platform also has a massive global audience. This means you are not limited to finding customers in your neighborhood. You can sell your services to clients from around the world. For teens with digital skills, this is a fantastic way to turn hobbies into income.

    Step 1: Get Parental Involvement and Permission

    The most important rule for getting started on Fiverr as a teenager: what you can do is involving a parent. The account must be created in their name . They will be responsible for all legal and financial aspects.

    Sit down with your parent and explain your plan. Show them this guide. They need to understand that they will be the ones verifying their identity with a government ID . They will also handle the tax information linked to the account. Their support is not just helpful; it is mandatory.

    Step 2: Set Up the Account Properly

    Once your parent agrees, you can set up the account together. Follow Fiverr’s guidelines closely to avoid getting restricted. Your profile picture should never feature a minor’s face . Use a logo, a picture of your work, or a photo of the parent managing the account.

    Your profile and gig descriptions must be transparent. Include a statement that clearly says: “The service is provided by a minor under an account owned by the parents of [your name] and managed by them” . This honesty builds trust with buyers and keeps you compliant with Fiverr’s rules.

    Step 3: Know What Services You CANNOT Offer: Getting Started on Fiverr as a Teenager

    Fiverr bans minors from offering certain types of services entirely. This is for your safety. According to the Minor Policy, users under 18 cannot provide :

    • Dance lessons
    • Modeling
    • Greeting cards and videos
    • “Your message on” services (personalized content featuring minors)

    Additionally, you cannot offer anything sexually suggestive, violent, or exploitative. Child Sexual Abuse Material (CSAM) is reported to the authorities immediately . Stick to safe, skill-based services, and you will be fine.

    Step 4: Choose a Safe and Skill-Based Gig

    Now for the fun part: picking a service. When getting started on Fiverr as a teenager: what you can do, focus on digital skills that do not require you to appear on camera. Here are some great options for beginners:

    1. Voiceover Work (with Care)

    Voiceover is specifically mentioned in Fiverr’s policy as acceptable for minors, provided it is clearly stated . If you have a clear speaking voice, you can record short scripts for YouTube intros, explainer videos, or ads. You just need a quiet room and a decent microphone (even a phone mic can work initially) .

    2. Social Media Content Creation

    Many small businesses need help creating posts for Instagram or TikTok. If you are good at Canva, you can offer to design eye-catching graphics . You can also write captions or suggest hashtags. This is a high-demand gig that lets you be creative.

    3. Basic Graphic Design

    You do not need to be a professional artist. Using free tools like Canva or Adobe Express, you can create simple logos, banners, or social media templates . Offer “basic logo design” or “simple flyers for events.” It is a great way to build a portfolio.

    4. AI Art and Prompt Writing: Getting Started on Fiverr as a Teenager

    This is a growing field in 2026. You can learn to write prompts for AI tools like Midjourney or DALL·E . Businesses and creators need unique AI-generated images for their projects. You can sell custom prompts or the generated artwork itself.

    5. Data Entry and Virtual Assistant Tasks

    If you are organized and detail-oriented, offer data entry services. This involves typing information into spreadsheets or cleaning up data . You can also offer basic virtual assistant tasks like scheduling appointments or online research . These jobs require no special software.

    6. Proofreading and Editing: Getting Started on Fiverr as a Teenager

    If English is your strong suit, offer to proofread blog posts or school essays . You can use tools like Grammarly to help you. This service is always in demand by writers and students.

    7. Creating Digital Products: Getting Started on Fiverr as a Teenager

    Instead of a service, you can sell a product. Design printable planners, sticker sheets, or study guides . You can sell them on Fiverr as a digital download. Once created, these can sell multiple times with no extra work.

    8. Etsy Product Mockups

    Etsy sellers need attractive photos of their products. You can create realistic mockups (like a t-shirt on a model or a mug on a table) using tools like Placeit . This helps sellers visualize their items.

    9. Resume Writing

    Help job seekers by writing or updating their resumes. Many professionals need help making their experience look good on paper . You can also offer to optimize their LinkedIn profiles. This is a service that directly helps people achieve their goals.

    10. Podcast Editing: Getting Started on Fiverr as a Teenager

    Podcasting is booming. You can offer to edit raw audio files, remove background noise, and add intros and outros . Free software like Audacity makes this easy to learn. It is a technical skill that pays well.

    Step 5: Create Your First Gig: Getting Started on Fiverr as a Teenager

    Once you have chosen your service, it is time to create your gig. This is your product listing. Use relevant keywords in your title and description so people can find you . For example, instead of “I will design,” say “I will design social media graphics for fitness brands.”

    Choose strong images that reflect your work. Keep your description clear and focused on what the buyer gets. Offer different packages (Basic, Standard, Premium) at different price points. This gives clients options.

    Step 6: Stay Safe and Professional: Getting Started on Fiverr as a Teenager

    Safety is the top priority when getting started on Fiverr as a teenager: what you can do. Never communicate with clients outside of Fiverr. Keep all messages on the platform. This protects you and provides a record if issues arise.

    Do not share personal information like your address or phone number. If a request feels wrong or makes you uncomfortable, you can decline it. Trust your instincts. Fiverr also has a Resolution Center to help manage disputes professionally .

    Step 7: Manage Orders and Deliver Quality Work

    When you get an order, treat it seriously. Deliver your work on time. If you are going to be late, communicate with the client. Use the “Deliver your work” button on the order page to submit files .

    After delivery, the client has three days to review your work. If they do not respond, the order is marked as complete automatically. Once completed, the funds will be credited to your account. Remember, freelancers receive 80% of the client’s payment, and there is a 14-day clearing period before you can withdraw the money .

    Step 8: Encourage Reviews and Build Reputation: Getting Started on Fiverr as a Teenager

    Positive reviews are your best marketing tool. After a successful order, politely ask the client to leave a review. Good reviews help your gig rank higher in search results .

    As you complete more orders, you will move up Fiverr’s levels. Each level unlocks new benefits and opportunities. Focus on delivering quality work, and your reputation will grow organically.

    What Happens When You Turn 18?

    The good news is that your work does not have to disappear. Once you turn 18, you can contact Fiverr’s Customer Support to transfer the account to your own name . You will need to complete ID verification using your own ID. After approval, you can run the account independently without your parent’s oversight . This is a smooth transition into full adulthood freelancing.

    Conclusion: Getting Started on Fiverr as a Teenager

    Freelancing on Fiverr is an excellent way for motivated teens to earn money and learn professional skills. The key is following the rules: involve your parents, set up the account correctly, and choose appropriate gigs. By focusing on quality and safety, you can build a successful freelance business while still in school.

    For more tips on managing your freelance income and balancing work with education, be sure to visit evdrivetoday.com for additional resources and community support.

    Now, we want to hear from you! What skills do you have that you think would make a great Fiverr gig? Drop a comment below and share your ideas with the community.

  • How to Become a Tutor in Your Best Subject

    How to Become a Tutor in Your Best Subject


    Love math, science, or English? Learn how to become a tutor in your best subject with this step-by-step guide to finding students and setting rates.

    A focused young tutor smiling while explaining a math problem to a younger student at a kitchen table with notebooks and pencils.

    If you excel in a specific area at school, you have a valuable skill. This guide will show you how to become a tutor in your best subject and turn that knowledge into cash. You do not need a teaching degree. You just need patience, good communication, and a solid grasp of your topic. Whether you love algebra, Spanish, or creative writing, there is a younger student out there who needs your help. Let us walk through the process of building a tutoring business from the ground up.

    Why Tutoring is a Great Opportunity

    Tutoring is one of the most flexible and rewarding jobs for students. You set your own hours and choose who you work with. It also reinforces your own knowledge. Teaching a concept to someone else helps you understand it at a deeper level. According to educational experts at the University of Kansas, peer tutoring benefits both the tutor and the student academically . You are not just earning money; you are also investing in your own brain.

    Parents are always looking for affordable help. Professional tutors can charge over $50 per hour. As a student, you can charge less and still make great money. This creates a win-win situation. Families get quality help at a lower cost, and you gain experience and income. Learning how to become a tutor in your best subject opens doors to future opportunities like scholarships and college applications.

    Step 1: Identify Your Strongest Subjects

    The first step is honest self-assessment. What class do you find easiest? Where do your friends ask you for help? It could be a core subject like math or science. It could also be a niche area like music theory, coding, or test preparation.

    Look at your own report cards. If you have consistently high grades in a subject, that is your sweet spot. You might also consider subjects you are passionate about. Enthusiasm is contagious. If you love history, that excitement will rub off on your student. Write down your top three subjects. These will be the services you offer. This clarity is the foundation of how to become a tutor in your best subject.

    Step 2: Know Your Curriculum: How to become a tutor in your best subject

    Knowing the topic is one thing. Knowing what is taught in each grade is another. Go online and look at the standard curriculum for your state or country. For example, a 5th grader learns different math concepts than an 8th grader. The Common Core State Standards Initiative provides detailed guidelines on what students should know at each level .

    Understanding these standards helps you prepare. If a parent says their child is struggling with fractions, you need to know exactly what fraction skills are expected at that age. This preparation makes you look professional and effective. It shows you have done your homework before the first session even starts.

    Step 3: Gather Your Resources

    You do not want to show up empty-handed. Gather your old textbooks, notes, and worksheets. These are excellent teaching tools. You can also find free resources online. Websites like Khan Academy offer practice exercises and instructional videos.

    Create a bank of practice problems. You can use these during sessions or assign them as homework. Having a structured plan keeps the session focused. It prevents wasted time and shows the student (and their parents) that you are serious about how to become a tutor in your best subject.

    Step 4: Decide on Your Format: How to become a tutor in your best subject

    How will you conduct your sessions? You have a few options. In-person tutoring at a local library or the student’s home is traditional and popular. It allows for easy interaction. Online tutoring via Zoom or Google Meet is also a great option. It saves travel time and expands your reach.

    Consider the subject. Hands-on subjects like science experiments might be better in person. Explaining essay structure can work well online. Choose the format that makes you most comfortable. Your comfort level translates into better teaching.

    Step 5: Set Your Rates: How to become a tutor in your best subject

    Pricing can feel awkward, but you must value your time. Research what other student tutors in your area charge. Rates often range from $15 to $30 per hour depending on the subject and your experience. You can start on the lower end to attract your first clients.

    Be clear about your pricing. Will you charge by the hour or offer package deals? Do you charge extra for travel? Decide these things in advance. Transparency prevents arguments later. It is a crucial part of how to become a tutor in your best subject successfully.

    Step 6: Create a Simple Portfolio: How to become a tutor in your best subject

    Parents want proof that you know your stuff. Create a one-page document or a simple Google Site. List your subjects, your experience, and your grades. Include a short bio about yourself.

    If you have any awards or honors, mention them. A portfolio builds trust. It moves you from “just a kid” to “a qualified tutor.” It is a simple marketing tool that pays off.

    Step 7: Advertise Your Services

    Now you need to find students. Start with your network. Tell your neighbors, family friends, and your own teachers. Your teachers might know parents looking for help. Ask if you can leave a flyer on their desk or the school bulletin board.

    Use social media (with a parent’s help). Post in local community groups on Facebook or Nextdoor. Include your subjects and your rates. A clear, friendly post can generate several leads. Spreading the word is essential in how to become a tutor in your best subject.

    Step 8: Master the First Meeting: How to become a tutor in your best subject

    The first session is a job interview. Arrive on time and be prepared. Start by getting to know the student. Ask them what they find difficult. Build a rapport. A relaxed student learns better.

    Go over the parent’s goals. What do they want their child to achieve? A better grade? More confidence? Setting clear goals from the start guides your future lessons. It also shows the parent you are focused on results.

    Step 9: Use Effective Teaching Techniques: How to become a tutor in your best subject

    Teaching is not just telling someone the answer. It is guiding them to find it themselves. Use the “I do, we do, you do” method. First, you solve a problem while explaining your thinking. Then, you solve one together. Finally, let the student try one on their own.

    Ask open-ended questions. Instead of saying “The answer is 4,” ask “How did you get that number?” This encourages critical thinking. Research from Stanford University’s education department shows that students retain information better when they actively participate in the learning process . Using this method sets you apart.

    Step 10: Handle Different Learning Styles: How to become a tutor in your best subject

    Not every student learns the same way. Some are visual learners who need diagrams. Others are auditory learners who need things explained verbally. Some need to write things down to remember them.

    Pay attention to how your student responds. If they are struggling with your explanation, try a different approach. Draw a picture. Tell a story. Use physical objects like coins for math. Adapting to their style makes you a more effective teacher. It is a hallmark of how to become a tutor in your best subject.

    Step 11: Provide Progress Reports

    Keep parents in the loop. After a few sessions, send a quick email. Tell them what you have covered and what you see improving. Mention any areas that still need work.

    This communication is gold. It reassures parents that their money is well spent. It also makes them more likely to recommend you to others. Good communication builds a loyal client base.

    Step 12: Handle Difficult Situations

    Sometimes you will face challenges. A student might be unmotivated or distracted. A parent might have unrealistic expectations. Stay calm and professional.

    If a student is distracted, take a short break. Switch activities. If a parent expects a grade to jump overnight, explain that learning takes time. Setting realistic expectations is part of the job. Handle these situations with grace, and your reputation will grow.

    Step 13: Expand Your Services

    Once you are established, think about growing. Can you offer group sessions? Group tutoring lowers the cost for parents and increases your hourly income. Can you offer summer “refresher” courses?

    You can also add new subjects as you progress in school. The more you offer, the more clients you can attract. This growth mindset is key to long-term success in tutoring.

    Conclusion

    Helping others succeed academically is a fantastic feeling. It builds confidence, reinforces your knowledge, and puts money in your pocket. By following these steps, you have a clear roadmap for how to become a tutor in your best subject. Start small, focus on quality, and let your reputation do the marketing for you.

    For more tools and resources to manage your new tutoring business, be sure to check out the articles and templates available at evdrivetoday.com. We have guides to help you track hours, manage payments, and grow your client base.

    Now, we want to hear from you! What subject are you most excited to teach? Do you have any questions about getting started? Drop a comment below and join the conversation

  • The Ultimate Guide to Starting a Dog Walking Business

    The Ultimate Guide to Starting a Dog Walking Business


    Ready to turn your love for dogs into cash? Here is the ultimate guide to starting a dog walking business with tips on pricing, safety, and finding clients.

    If you love animals and want to be your own boss, this is the ultimate guide to starting a dog walking business you have been waiting for. It breaks down every step you need to take to turn a simple idea into a profitable venture. We will cover everything from getting ready for your first walk to expanding your client list. You do not need years of experience, just a love for dogs and a willingness to learn. Let’s get started on building a business that keeps you outdoors and makes money.

    Why Read This Guide Now?: The ultimate guide to starting a dog walking business

    Dog walking is one of the fastest-growing service industries today. As people return to offices, their furry friends are left home alone. They need someone reliable to provide exercise and companionship. This creates a massive opportunity for you. This guide acts as your roadmap, helping you navigate the basics of starting up. It simplifies the process so you can start earning quickly and confidently.

    Step 1: Assess Your Readiness and Skills:The Ultimate Guide to Starting a Dog Walking Business

    Before you invest in leashes and business cards, take a good look at yourself. Being a dog walker is more than just a casual stroll. You must be physically fit enough to handle dogs that pull. You also need to handle unexpected situations calmly. According to business experts, knowing your strengths and weaknesses is the foundation of success .

    Consider your experience with different dog breeds. Have you handled large, energetic dogs before? If not, volunteer at a local shelter first. This gives you hands-on experience without the pressure of a client watching. It also builds your confidence for when you start the ultimate guide to starting a dog walking business journey for real. Remember, you are responsible for a family member’s beloved pet. Reliability and patience are non-negotiable traits.

    Step 2: Gain Essential Experience and Training: The ultimate guide to starting a dog walking business

    Formal qualifications are not always mandatory, but they give you a serious edge. Clients feel safer hiring someone who knows what they are doing. Consider taking a course in pet first aid. This training teaches you how to handle choking, heatstroke, or injuries. It could save a dog’s life and protect your reputation. The American Veterinary Medical Association provides excellent resources on animal health emergencies that every walker should know .

    You can also learn about animal behavior. Understanding why a dog growls or cowers helps you avoid dangerous situations. It allows you to manage group walks better. This knowledge turns you from a hobbyist into a professional. It is a key investment highlighted in the ultimate guide to starting a dog walking business.

    Step 3: Create a Solid Business Plan

    Every successful business starts with a plan. Yours does not need to be a 50-page document, but it should outline your goals. Decide what services you will offer. Will you do solo walks, group walks, or both? Will you also offer pet sitting? The SCORE association, a resource supported by the SBA, provides templates that help you map out these decisions .

    Your plan should include financial projections. Estimate your startup costs for supplies, insurance, and marketing. Then, figure out how much you need to charge to make a profit. A plan also helps you identify your target market. Are you targeting busy professionals or elderly neighbors? Defining this early makes marketing easier later. This is a crucial phase in the ultimate guide to starting a dog walking business.

    Step 4: Register Your Business and Get Insured: The ultimate guide to starting a dog walking business

    To operate legally, you need to register your business. Check with your local county or city government about requirements. Some areas, like Marin County, require specific commercial permits for dog walkers using public parks . Failing to get the right permits can result in fines. Make sure you follow the rules.

    Insurance is just as important as a license. If a dog bites someone or gets injured on your watch, you could be liable. Public liability insurance protects you from these financial risks. It shows clients that you are professional and prepared. This step is not optional; it is essential for protecting everything you build.

    Step 5: Set Your Pricing Structure

    Pricing can be tricky. You want to be competitive, but you also need to value your time. Research what other walkers in your neighborhood charge. The average cost for a 30-minute walk often ranges from $20 to $30, depending on your location . You can charge more for solo walks or for administering medication.

    Consider offering package deals. A client might pay for five walks upfront at a slight discount. This guarantees you recurring income. Be transparent with your rates. Put them on your website so clients know what to expect. Clear pricing builds trust and prevents awkward conversations later.

    Step 6: Gather the Right Equipment: The ultimate guide to starting a dog walking business

    You do not need much to start, but the gear you buy must be durable. Invest in sturdy, non-retractable leashes. Retractable leashes offer little control in emergencies. Carry plenty of waste bags; leaving messes is a quick way to lose clients. A collapsible water bowl is great for hot days.

    You should also carry a basic pet first-aid kit. Include bandages, antiseptic wipes, and tweezers for ticks. A fully charged phone is mandatory for navigation and emergencies. Having the right tools makes you look prepared and professional. It is a simple way to stand out.

    Step 7: Master Canine Body Language: The ultimate guide to starting a dog walking business

    Safety relies on your ability to read dogs. A wagging tail does not always mean a happy dog. You need to recognize signs of stress or aggression. Lip licking, yawning, or a stiff body can indicate discomfort. The ASPCA provides excellent guides on reading dog body language, which is a vital skill for any walker .

    If you notice a dog is tense, give them space. Avoid forcing them to interact with other dogs. Understanding these signals prevents fights and injuries. It also helps you tailor the walk to the dog’s personality. Some dogs need a slow, sniff-heavy walk, while others need a fast-paced run. Adapting to their needs makes you a better walker.

    Step 8: Develop a Marketing Strategy: The ultimate guide to starting a dog walking business

    You cannot make money if no one knows you exist. Start by creating a simple website or social media page. Use platforms like Instagram to post cute photos of the dogs you walk (with permission). This visual proof attracts local attention.

    Networking is powerful in this industry. Build relationships with local veterinarians and pet stores. Ask if you can leave your business cards on their bulletin boards. Word-of-mouth referrals are gold in the pet care world . Happy clients will tell their friends. Make sure you provide excellent service so they have good things to say.

    Step 9: Conduct Thorough Meet-and-Greets: The ultimate guide to starting a dog walking business

    Never take on a new client without meeting them and their dog first. This consultation is vital. It allows you to see how the dog behaves at home and on the leash. It also lets you discuss the owner’s expectations. Ask about the dog’s medical history, fears, and favorite toys. The Humane Society recommends using this time to observe how the dog reacts to strangers .

    Use this meeting to explain your policies. Discuss cancellation terms and payment methods. Being clear upfront prevents misunderstandings. If the dog seems aggressive or the owner seems difficult, trust your gut. It is okay to decline a client if the fit is not right.

    Step 10: Manage Your Schedule Efficiently

    As you grow, scheduling becomes complex. You need to manage multiple clients with different time windows. Use a digital calendar to block out your walks. This prevents double-booking and ensures you are always on time. Being late is a major complaint in this business.

    Plan your routes geographically. Try to book clients who live near each other on the same days. This reduces your travel time and gas costs. Efficient scheduling maximizes your earning potential. It is a key operational tip in the ultimate guide to starting a dog walking business.

    Step 11: Provide Excellent Customer Service: The ultimate guide to starting a dog walking business

    Dog walking is a service business. You are serving the owner as much as the dog. Send updates after each walk. A quick photo or text message reassures the owner that their pet is happy. It shows you care about the details.

    Always leave the client’s home as you found it. Wipe your feet and secure the door properly. Small acts of professionalism build long-term loyalty. Clients will stick with you because they trust you in their home. That trust is your most valuable asset.

    Step 12: Handle Emergencies Professionally: The ultimate guide to starting a dog walking business

    Despite your best efforts, things can go wrong. A dog might eat something bad or slip their collar. Stay calm and follow your training. Contact the owner immediately. If it is a medical emergency, head straight to the vet clinic they provided.

    Document everything. Write down what happened and what actions you took. Good record-keeping protects you legally. It also shows the owner that you handled the situation responsibly. Being prepared for the worst is part of being a professional.

    Conclusion: The ultimate guide to starting a dog walking business

    Starting this venture is exciting and rewarding. You get to spend your days outdoors with happy animals. But remember, it requires dedication, planning, and a genuine care for safety. By following the steps in the ultimate guide to starting a dog walking business, you set yourself up for long-term success.

    We hope this guide has given you the confidence to take the first step. For more resources on managing your small business and finding the right tools, be sure to visit evdrivetoday.com for additional tips and community support.

    Now, we want to hear from you! What is the biggest challenge you face in starting your dog walking business? Drop a comment below and let’s chat about it.